
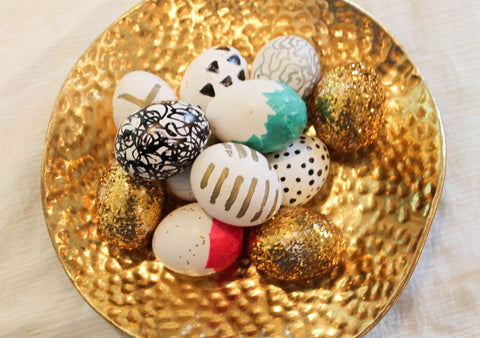
Need a fun activity to do with the kiddos this weekend?? See how to make these fun Easter Eggs with your little helpers.
Vinegar and hard-boiled eggs do not make for a well-smelling home. My mother always made sure that a few days before Easter we sat around the kitchen table as a family and dipped our hard-boiled eggs into colored vinegar. Every. Single. Year. Despite the smell, this is a favorite memory of mine. Comparing my eggs to my brothers’ eggs always made me feel good about myself, because I was so much better at it than them! They were coordinated, intelligent, handsome, and funny. I was good at coloring eggs.
I wanted to do something fun and different this year, but I don’t have a lot of time to spend making my own dye, mixing colors in shaving cream, or painting my eggs with water-colors. I opted for some easier, time-friendly options to get my egg decorating tradition in with a modern twist.
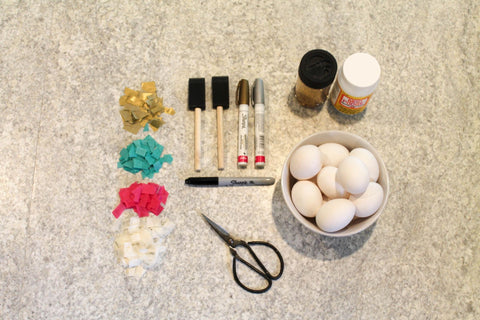
SUPPLIES:
Hard-boiled eggs
Permanent Marker
Scissors
Tissue paper
Glitter
Mod Podge
Foam paint brush
STEPS
Boil your eggs. Put your eggs in a pot and cover them with cold water. Turn the stove on high until boiling. Once the water is boiling, turn the heat on low. Put a lid on your pot. Set the timer for 10 minutes. Remove the pot from heat. Run the eggs under cold water. Place the eggs in the fridge for 1-2 hours.
You can also find foam eggs at your local craft store that look real. If you choose to use these, you’ll be able to set your eggs out as decorations!
TISSUE PAPER EGGS
1. Make sure your egg is dry before using it!
2. Cut little square pieces of tissue paper. They do not have to be perfect squares. Just hack away!
3. Cover half of your egg in Mod Podge using your foam brush.
4. Place the tissue squares on the egg and cover as much of the egg as you want. I chose to do half of the egg, but you can cover all of it if you’d like!
5. Paint over the tissue paper with more Mod Podge to smooth out the edges and seal the paper in.
6. Set eggs in the carton and place them in the fridge to dry.
GLITTER EGGS
1. Make sure your egg is dry!
2. Pour some glitter onto a paper plate.
3. Completely cover your egg in Mod Podge using a foam brush.
4. Lay your sticky egg in the pile of glitter.
5. Shake more glitter onto the egg.
6. Let dry for 30 minutes.
7. Once dry, add more Mod Podge to the parts of the egg that are still showing through.
8. Sprinkle more glitter to cover to Mod Podge.
9. Leave on the paper plate and set in the fridge to dry.
MARKER EGGS
1. Say it with me! “Make sure your egg is dry!”
2. Using a permanent marker or a paint marker in any color, draw on your egg making any designs that match your style! I chose geometric shapes and patterns for the most part, because they are simple.
3. Store your eggs in the egg carton in the fridge.